Connect with us

Replicate-Worthy Crafts

Art in the Style of Eric Carle

Let’s explore the colorful world of Eric Carle, children’s book author and illustrator. We’ll be using his famous works like “The Very Hungry Caterpillar,” “The Grouchy Ladybug,” and “The Very Busy Spider” as inspiration for our own art pieces. Whether you’re a seasoned artist or just starting out, we’ve got some tips and tricks to share with you. So grab your paintbrushes and let’s get to work!

Avatar photo

Published

on

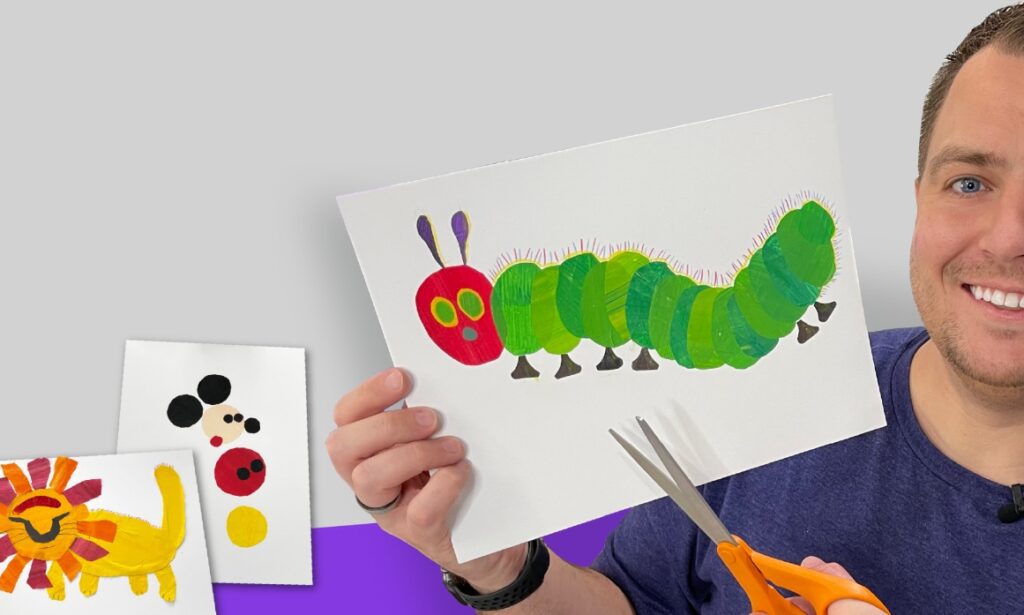
Hi there, little caterpillars! Today, we’re going to be exploring the colorful creations of Eric Carle, children’s book author and illustrator. You may have munched on some of his famous works like “The Very Hungry Caterpillar,” “The Grouchy Ladybug,” and “The Very Busy Spider.” We’re going to be using these books as inspiration as we create our own art pieces. Whether you’re a seasoned artist or just starting out, we’ve got some tips and tricks to share with you. Grab your paintbrushes and let’s get to work, we can’t wait to see the amazing creations you’ll come up with!

Please don’t forget to like the video and subscribe to our channel for more videos like this one.

Creating Eric Carle-Inspired Art: A Step-by-Step Guide

Eric Carle is known for using painted papers in his distinctive collage-style illustrations, which he creates by cutting and layering hand-painted papers to create bold, vibrant, and imaginative artwork.

In addition to colorful papers, you’ll need scissors, a cutting mat, a ruler, and a pen or pencil for drawing.

We made a list of six steps to use when making your Eric Carle-inspired art.

  1. Create your own painted papers:
    If you don’t have any store-bought painted papers, you can create your own by painting a series of papers in various colors and patterns. Use acrylic paints, watercolors, or any other type of paint that you prefer. Allow the paint to dry completely before moving on to the next step.
  2. Choose your colors:
    Eric Carle is known for his bold, vibrant colors. Choose a color scheme that you like and that will work well with the theme of your art.
  3. Cut your shapes:
    Use your scissors and cutting mat to cut out a variety of shapes and figures from your painted papers. You can use a ruler to help you create straight lines and precise shapes.
  4. Arrange your shapes:
    Lay out your cut-out shapes on a flat surface and experiment with different arrangements until you find a composition that you like. Think about how the shapes can interact with one another and create depth and dimension in your art.
  5. Glue your shapes:
    Once you have your final arrangement, use glue to adhere the shapes to a piece of paper or canvas. You can use a paintbrush to apply the glue or a glue stick for a neater finish.
  6. Add details:
    Use colored pens or pencils to add details to your art. You can draw lines, dots, and other shapes to add texture and interest to your composition.

Step back and admire your work: once you have finished your art, take a step back and admire your creation. You have just created your own unique, Eric Carle-style masterpiece!

Watch on YouTube: How to Make Detailed Eric Carle-style Art with Hand-Painted Paper Featuring Mickey Mouse and Simba

Video Transcript

Today we’ll be creating art in the style of Eric Carle. “The Very Hungry Caterpillar”, “The Grouchy Ladybug”, and the “Very Busy Spider” are some of his most famous works? Eric Carle is known for using hand-painted papers in his distinctive illustration style where he cuts and layers these pieces into bold vibrant and imaginative artwork. In addition to those colorful papers, you’ll also need some scissors, a cutting mat, a ruler, and a pen and pencil for drawing. We’ve made a list of six steps to use when creating your own Eric Carle inspired art. Step one: Create your own painted papers if you don’t have any store-bought painted papers, you can create your own by painting a series of papers in various colors and patterns. Step two: Choose your colors Eric Carle is known for his bold, vibrant colors. Choose a color scheme that you like and that will work well with the theme of your art. Step three: Cut out the shapes Use your scissors and cutting mat to cut out a variety of shapes and figures from your painted papers. Step four: Arrange your shapes Lay out your cut out shapes on a flat surface and experiment with different arrangements until you find a composition that you like. Step five: Glue your shapes down Once you have your final arrangement, use glue to adhere the shapes to a piece of paper or canvas. Finally, step six: Add details use colored pens or pencils to add details to your art You can draw lines, dots, and other shapes to add texture and interest to your composition. Take a step back and admire your work. You’ve just completed your very own Eric Carle style masterpiece. We’re going to get started by making our hand-painted papers. We laid down some paper before getting started because this can make quite a mess. Take this tissue paper that’s meant for wrapping gifts, and we’re going to apply a thin layer of paint. We want to do a bunch of colors we’re looking for a really nice textured paper that we can use for our collage. That is a big piece of paper. Once you’ve painted the pieces, you do not want to let them sit here, they’ll kind of glue to the tabletop. So, you might want to have some kind of clothes line hung up. We’ve got some strings hung around and we’re going to clip these up to let them dry. And don’t worry if it looks all wrinkled once they’re dry…you’re going to just flatten them all together. They’ll all flatten out and you’re gluing it down in the end anyway. Which colors do I want to go for? Do you want to take the warm colors and I’ll stick with kind of the lighter ones. You can do it like 40 different sheets. So what’s the easiest way to paint onto this paper? There’s really not a right way or a wrong way. This feels like chaos to me. Doing some research about Eric Carle… Eric was actually on Mr. Rogers. He actually showed Mr. Rogers what he does to prepare his papers. Oh, cool. He actually used tissue papers…just like this. He got really detailed. He used pieces of carpet to add layers. Oh, wow. Like he’d paint like green down and then he’ll dab some blue paint on a piece of carpet and he’ll make stripes. Wow, that’s cool. For today’s I think we’re just gonna do whatever we feel like. Okay. …and see what happens. Don’t worry about putting paint down on any aluminum foil or anything. Just do a few drops. Oops! I already started. Oh, that’s good. Yeah, just get… get messy. Oh, it looks like a crime scene already. This is actually just gonna be kind of a green to a blue. Or poor paints. We just go at ’em. There we go. I like it, Picasso! [Music] So a few days ago I actually created quite a few different options for us to use. We wanted these to be dry before going into the collages. Oh, this blue one’s cool. This one’s kind of a brown with a black mixed in it looks like. Once it’s dry, you just pull it out, flatten it out, put something heavy on top and they flattened out pretty nicely. Awesome. Here’s another one. It started to break as I was putting it on this string. But it really doesn’t matter because you’re gonna be using little pieces of these. Yeah, so we’re not gonna throw the scraps away we’ll save them for future project. We’re gonna just start with some fresh scissors. Nice. You need scissors to open the scissors. All right, should we go ahead and set aside like the colors that we’re gonna use? So two is going to be choosing your colors and then step three is cutting out your shapes. This is a lot of paper. It took me quite a while to paint all of these. Yeah! So you’ll want to arrange your shapes before you start gluing things down. So do I cut out the shapes first, or what do I do next? You’re choosing your colors, then you cut out your shapes. Okay. And then you arrange your shapes to decide how you want to glue it down. Okay. And then you ultimately glue it down. Okay, awesome. I’ve got some ideas for some cool details. Hopefully, so… I’m hoping it will turn out cool. It’s kind of a neat way to do a collage rather than just using black paper. Like this is just a black tissue paper, but you can see the brushstrokes. The brushstrokes look really cool on this. Can we say what we’re making yet, or do we want to keep it kind of a secret? I’m doing a nod to some cool artwork that I’ve seen before by an artist named Damien Hirst. It’s called Mickey Circles. So I’m going to be cutting out a bunch of circles and gluing those down. In the Lion King, there’s the part where Rafiki draws Simba on the tree. And so I’m kind of going to be replicating that drawing of Simba, but with the collage style of like how it looks when it’s drawn on to the tree. See how it turns out. Definitely gonna look more like it’s from a kid’s book because that’s kind of how these look because it’s the style that Eric Carle did. And it actually looks really cool with all the different textures and the colors. I’m excited to see how it turns out. It’s really cool just seeing the texture lines and the paper. You can make one and make a bunch of color copies. That’s what they do for Eric Carle’s books, right? Yeah. Cause he makes the original and then they make copies and that’s how they make the pages. It kind of feels like a kindergarten project or something you do in elementary school. Cutting circles is a tougher than it looks. Would it be a bad thing to glue down this before I add more to it? I don’t think so. Okay. Yeah, we have a bunch of different glue options. That’s just the regular… I’m gonna go for the regular. So bad thing about this is it is tissue paper, so you will see spots that will come through. So I do think using a glue stick might be the best option. This is scary. Once they go down there’s no going back. I mean, I really could just cut out another shape. But it feels really permanent for some reason. If you don’t like that layer just put another layer on top of it. Look you can see the Mickey kind of coming together. Oh, that looks really cool! It is missing the color for the head. Something I’m noticing as I’m gluing it down is you might get a few little wrinkles here and there. So it kind of adds a texture even though it it may be like oh, it’s ruined because it’s not completely flat. I think it’s okay because it kind of adds to the aesthetic a little bit. [Music] All right, so show and tell time. Here’s my Mickey Mouse. This one is in the style of Damien Hirst’s Mickey Circles. So it’s kind of a… an Eric Carl meets Damien Hirst. Um, really fun! It turned out so cool. I love the textures of the paint, too… on the tissue paper. It looks really cool because you have the cool texture from the paint as well. I’m gonna go with my more simple one first for show and tell. So first, we have our bouquet of balloons. Really simple. You just cut out circles and kind of layer them over the top of each other. They’re kind of translucent, so it actually looks like real balloons and then you just draw the strings at the end. And then you’ve got a bouquet of balloons with the cool texture and really easy to make. I enjoyed making that one. It was really quick! For doing Eric Carl style art, you got to do the caterpillar! It ended up being a lot simpler than I thought it would be. And it turned out so cool, too! The trick on this was not being afraid to overlap. So all those different segments – it’s okay if they’re bigger circles. You just overlap the next one on top of it. I was thinking I’d have to cut out every little segment separately. And that would take forever, so that ended up saving a lot. The other trick was actually folding and layering so that when I cut it was cutting through like six pieces at a time. Then also, the trick is to go back after with the colored pencil and add those little textures. Which you actually used on yours. I did. Yes, and you may have already seen a portion of this… But this is my more demanding project. I did a depiction of Simba with the tissue paper kind of like the drawing that Rafiki does on the tree a little bit. I tried to make it look more like that drawing than the actual character Simba. And then I did the really cool thumb swipe and we’ll probably show that to you… of the paint on his forehead like Rafiki does in the movie. And I liked this project because I was able to combine the painted paper, the colored pencils, and some of the paint too to make a cool hybrid project that totally looks like something inspired by Eric Carle’s work. If you decide to try this out, please let us know about in the comments. We’d love to hear about the different projects you try. If you enjoyed this video, please like and subscribe to our channel and please ring the bell so that way you’ll be notified when we do more videos. This is something I could definitely see us doing later on down the line, so if you enjoyed this video, we might do it again because the possibilities are endless. And by subscribing, you won’t miss that video. Yep. Thanks so much for watching. Thank you. Goodbye!

Replicate-Worthy Crafts

Cruise Towel Animals… Swan, Elephant, Hanging Monkey

Bring that cabin surprise home. This pillar walks you through three classic cruise towel animals… the swan, the elephant, and the hanging monkey. You will see the tools we use, step by step folds, quick fixes, and easy ways to display each animal so it lasts all week.

Avatar photo

Published

on

Elephant, Monkey, and Swan Towel Animals

Bring that cabin surprise home. This pillar walks you through three classic cruise towel animals… the swan, the elephant, and the hanging monkey. You will see the tools we use, step by step folds, quick fixes, and easy ways to display each animal so it lasts all week.

Watch the fold along Our video covers all three animals with real time fixes. Swan, Elephant, and Hanging Monkey tutorial.


Key Takeaways

  • Use mid weight cotton terry. Skip fabric softener so loops grip and folds hold.
  • Build tight tubes, set a belly band early, and make key creases last for sharp profiles.
  • For long necks and trunks, add a short dowel spine inside the roll.
  • Display with removable dots, soft ties, and the binder clip hanger hack for the monkey.

Niko’s Note 🐾 Snap a quick photo when your pose looks perfect. Rebuild to the photo after laundry day.


Tools and Setup

Towels

  • Bath Towel about 28 × 53 in (70 × 135 cm) for bodies
  • Hand Towel about 20 × 39 in (50 × 100 cm) for heads and details
  • Face Towel about 12 × 12 in (30 × 30 cm) for shims and minis
    Sizing refresher Towel Sizes… Bath Sheet, Towel, Hand, Face

Helpers
Soft ties (elastic hair ties), short wooden dowels or chopsticks (6 to 8 in), removable gel dots, non slip hanger, two medium binder clips


Swan… Elegant in 6 Moves

You need 1 × Bath Towel
Time 4 to 6 minutes the first time

  1. Square the towel Lay it flat. Align edges so rolls stay straight.
  2. Double roll to center Roll each long side tightly toward the middle to create a V valley.
  3. Fold in half Bring the two roll ends together so the valley faces out.
  4. Form the neck Hold the joined end and pull the valley up and forward to make a neck tube. Tighten the roll as you go.
  5. Seat the body Set the base down and curve the neck into an S shape.
  6. Key crease the beak Pinch the tip to a point. Hold for 2 seconds for a crisp line.
    Display Place two gel dots under the base tips. Add a small face towel pad under the belly for lift.
    Fixes Neck sliding back add a small washcloth shim under the chest. Beak looks soft re crease last and hold.

Elephant… Sturdy and Photo Ready

You need 2 × Bath Towels and 1 × Hand Towel
Time 8 to 10 minutes

Body and legs

  1. Body roll From the long edges of a bath towel, make a double roll to center. Fold in half so the valley faces out.
  2. Set the stance Pull the four corners down to suggest legs. Add a soft tie belly band under the body to stop unrolling. Hide the knot under the back.

Head and ears
3) Head tube Roll the hand towel tightly from a long edge to make a tube.
4) Ears Open the ends slightly and pinch corners to form ears.
5) Trunk curl Insert a short dowel or chopstick inside the center to help the curl.
6) Join Make a shallow cradle fold on top of the body and press the head in so it seats firmly.
Display Place on a tray. Add gel dots under the front feet if the surface is slick.
Fixes Belly unrolls tighten the belly band. Ears sag add a tiny locking tuck behind the head edge.


Hanging Monkey… Clip Rig and Balance

You need 1 × Bath Towel, 1 × Hand Towel, 2 binder clips, non slip hanger, 1 soft tie
Time 6 to 8 minutes

  1. Build the body Roll the bath towel into a long tube and fold into the classic monkey shape.
  2. Head Roll the hand towel into a tube and shape a round head.
  3. Rig the hanger Set two binder clips on the flattest part of the hanger shoulders. Angle pads slightly toward the hook.
  4. Seat the hands Clamp each “hand” fully into a clip so loops are not pinched by metal edges.
  5. Balance the torso Add a soft tie around the waist behind the back to stop slow slips.
  6. Hang and face the room Place the hanger on a rod and twist a quarter turn so the monkey faces forward.
    Deep dive Full rig steps and photos Binder Clip Hanger Hack for the Monkey
    Fixes Hands slip add painter’s tape inside clip pads. Head tilts add an inside fold to stiffen the roll.

Display and Care

  • Choose a dry room. Long hot showers relax folds.
  • Use removable dots under feet and a small riser under bellies for shelf displays.
  • Refresh routine re pinch key creases, tighten belly bands, and dust with a hand pump duster.
  • Laundry wash warm with a small amount of detergent. Skip fabric softener so loops stay grippy.

Keep Learning


FAQ

Do I need bath sheets No. Standard bath towels work for these builds. Use a bath sheet only if you want a larger display.
Will supports damage towels Not if you use soft ties, rounded dowel ends, and removable dots. Avoid pins or adhesives that leave residue.
Can I hang the monkey on any hanger A non slip flocked hanger is best. Smooth plastic works if you add grip and use binder clips.
How long will these hold shape About a week in a dry room with a quick refresh every couple of days.


Sources

Continue Reading

Replicate-Worthy Crafts

Towel Sizes… Bath Sheet, Towel, Hand, Face

Picking the right towel size makes folding easier and your shapes cleaner. This guide shows common sizes in inches and centimeters, how each size behaves in folds, and which animals we use them for in our tutorials.

Avatar photo

Published

on

Picking the right towel size makes folding easier and your shapes cleaner. This guide shows common sizes in inches and centimeters, how each size behaves in folds, and which animals we use them for in our tutorials.


Key Takeaways

  • Bath Towel is the workhorse for most bodies. Aim for about 28 × 53 in (70 × 135 cm).
  • Hand Towel is perfect for heads and details. Aim for about 20 × 39 in (50 × 100 cm).
  • Face Towel works for shims and minis. Aim for about 12 × 12 in (30 × 30 cm).
  • Bath Sheet is optional for oversized builds. About 40 × 63 in (100 × 160 cm) gives dramatic volume but needs stronger supports.

Niko’s Note 🐾 Mid weight cotton terry grips better than plush spa towels. Skip fabric softener so folds hold.


Comparison Table… Common Sizes and Uses

Size name Typical inches (range) Typical centimeters (range) Our go to spec What it is best for
Bath Sheet 35–40 × 60–70 90–100 × 150–180 40 × 63 in (100 × 160 cm) Oversized animals, dramatic swans, photo backdrops
Bath Towel 27–30 × 50–58 70–76 × 127–147 28 × 53 in (70 × 135 cm) Main bodies for swan and elephant, hanging monkey body
Hand Towel 16–20 × 28–40 40–50 × 70–100 20 × 39 in (50 × 100 cm) Heads, ears, trunks, detail rolls
Face Towel (Washcloth) 12 × 12 30 × 30 12 × 12 in (30 × 30 cm) Base pads, shims, mini animals

Sizes vary by brand. The “Our go to” column matches the towels we fold with in our videos and photos.


Which Size For Which Animal

  • Swan 1 × Bath Towel body… optional Face Towel under the belly as a base pad when displaying on a shelf.
  • Elephant 2 × Bath Towels for body and legs… 1 × Hand Towel for head and ears… short dowel inside the trunk when you want a strong curl.
  • Hanging Monkey 1 × Bath Towel body… 1 × Hand Towel head… two binder clips and a non slip hanger for the hands.
  • Minis Hand or Face towels for quick practice shapes.

Fit, Weight, and Fabric

  • Weight Choose mid weight cotton terry. Ultra plush looks luxe but fights tight rolls and relaxes faster.
  • Weave Standard loop terry grips well. Waffle or microfiber is slick and will loosen quickly.
  • Conditioning Wash towels before first use to remove coatings. Skip fabric softener. A tiny splash of white vinegar in the rinse can help keep fibers grippy.
  • Color Bright white photographs well. If you prefer color, avoid dark dyes that may transfer when damp.

Measuring and Converting

If your towel tag lists centimeters, divide by 2.54 to get inches. If it lists inches and you need centimeters, multiply by 2.54.
Examples

  • 70 × 135 cm27.6 × 53.1 in (we round to 28 × 53 in)
  • 50 × 100 cm19.7 × 39.4 in (we round to 20 × 39 in)
  • 30 × 30 cm11.8 × 11.8 in (we round to 12 × 12 in)

Storage and Care

  • Keep a dedicated folding set so display towels stay bright and grippy.
  • Wash warm with a small amount of detergent. Do not use fabric softener.
  • Dry fully, then store flat in a tote with your small tools… binder clips, soft ties, gel dots, short dowels.

Keep Folding


FAQ

Are bath sheets required No. They are fun for larger animals but add weight and need more support.
Can I mix sizes from different brands Yes. Check the tags and aim for the “Our go to” specs so folds match our tutorials.
Is microfiber ever useful Microfiber can work for a quick practice, but it slides in tight folds and will not hold a crisp crease.
What if my towels are slightly smaller or larger Use them. Adjust roll tension and add hidden supports when needed.

Continue Reading

Replicate-Worthy Crafts

Binder Clip Hanger Hack for the Towel Monkey

Hanging monkeys look amazing on a doorframe or shower rod, but towels can slip on smooth hangers. This support guide shows our fast binder clip hack that locks the monkey’s “hands” in place without damaging the towel. It takes two minutes and uses parts you probably have at home.

Avatar photo

Published

on

Hanging monkeys look amazing on a doorframe or shower rod, but towels can slip on smooth hangers. This support guide shows our fast binder clip hack that locks the monkey’s “hands” in place without damaging the towel. It takes two minutes and uses parts you probably have at home.

Watch it in action See the binder clip hack in our YouTube tutorial: Binder Clip Hanger Hack demo.


Key Takeaways

  • Use two medium binder clips on a non slip hanger. Clamp the towel “hands” into the clips so the monkey stays put.
  • Place clips on the flattest part of the hanger shoulders. Angle slightly inward so gravity tightens the grip.
  • Add a soft waist tie behind the back to stop slow slumps. Hide the knot under the outer wrap.
  • Protect towel loops with smooth jaws or a small strip of tape on the clip pads.

Niko’s Note 🐾 Clip, hang, then twist the hanger a quarter turn to face the room. Photos will look best straight on.


What You Need

Item Qty Recommended spec Purpose
Bath Towel 1 About 28 × 53 in (70 × 135 cm) cotton terry Monkey body
Hand Towel 1 About 20 × 39 in (50 × 100 cm) Monkey head
Binder Clips 2 Medium size, smooth jaws Clamp the hands
Non Slip Hanger 1 Flocked or rubberized shoulders Base to hang from
Soft Tie (elastic hair tie) 1 Fabric covered Hidden waist band
Optional gel dots 2 Clear removable Extra grip on slick rods

Need sizing refresh See Towel Sizes… Bath Sheet, Towel, Hand, Face.


Step by Step… The Binder Clip Rig

  1. Build the monkey Follow the head and body steps from the Pillar tutorial. Leave the “hands” ready to grip.
  2. Prep the hanger Choose a non slip hanger. If using a smooth plastic hanger, add a small strip of painter’s tape where the clips will sit.
  3. Place the clips Open two medium binder clips. Set them on the flattest part of each shoulder, about two finger widths from the ends. Angle the clip pads slightly toward the hook.
  4. Seat the hands Lift the towel hands into each clip. Close the clips so fabric sits fully inside the pads. Confirm loops are not pinched by metal edges.
  5. Balance the body Lift the hanger. If the torso settles downward, add a soft tie as a hidden waist band behind the back. Tighten just enough to hold shape.
  6. Hang and face the room Place the hanger on a rod or hook. Twist the hanger so the monkey faces forward. Tuck loose ends and fluff.

Fit Guide… Where To Put The Clips

  • Shoulder sweet spot Use the longest flat section of the hanger shoulders for maximum grip.
  • Angle inward Point the clip pads a little toward the hook so gravity pulls hands deeper into the clips.
  • Even height Match clip height on both shoulders so the head sits level.

Travel and Safety Notes

  • Hotel hangers Many hotel hangers have anti theft heads. You can still clamp clips to the shoulders. If the shoulders are very slick, add a small gel dot under each clip.
  • Avoid sharp teeth Only use smooth jaw clips or cover metal edges with a small strip of tape.
  • Dry towels only Moisture relaxes folds and can mark fabric under pressure. Fold and hang when fully dry.
  • Respect weight limits This hack is for towels only. Do not hang from light fixtures or narrow decorative rods.

Troubleshooting… Quick Fixes

Problem Why it happens Try this
Hands slip out of clips Pads are slick or angled wrong Add a small strip of painter’s tape inside pads and angle clips toward the hook
Torso slides down Gravity and no waist anchor Add a soft tie behind the back as a waist band
Head tilts forward Head roll too soft Add an inside fold or tighten the roll, then re seat in a cradle
Hanger rotates on rod Rod is slick Add gel dots on hanger shoulders or use a flocked hanger

Watch the Video Walkthrough

Skip step photos and see the binder clip hack in motion. Watch our demo on YouTube: Binder Clip Hanger Hack demo.


Keep Folding


FAQ

Will binder clips damage my towels Use smooth jaw clips or cover the pads with a bit of painter’s tape. Avoid clips with sharp teeth.
Do I need a special hanger A non slip flocked hanger works best. Smooth plastic hangers are fine with a little added grip.
How do I stop the monkey from rotating Place a small gel dot under each clip or use a hanger with rubberized shoulders.
What size towel should I use Use a Bath Towel for the body and a Hand Towel for the head. See our sizing guide for inches and centimeters.

Continue Reading

Trending