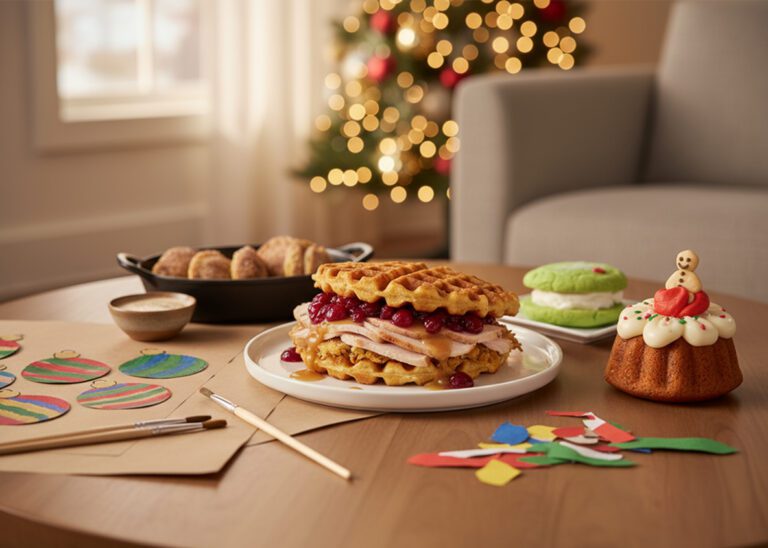
Connect with us

Food

Gingerbread Bundt Cake from Plaza Inn at Disneyland

Sugar and spice taste great in a slice! Join us as we attempt to replicate the Gingerbread Bundt Cake, a sweet spin on the taste of a classic Christmas cookie.

Published

on

Sugar and spice taste great in a slice! Join us as we attempt to replicate the glazed goodness of the Gingerbread Bundt Cake found at the Plaza Inn at Disneyland. This delectable dessert offers a spin on the iconic Christmas cookie that will be sure to bring glad tidings to you and yours this time of year.

Watch us make Gingerbread Bundt Cakes from Plaza Inn at Disneyland on YouTube

Please don’t forget to like the video and subscribe to our channel for more videos like this one.

Copycat Gingerbread Bundt Cake from Plaza Inn at Disneyland

Sugar and spice taste great in a slice! Join us as we attempt to replicate the glazed goodness of the Gingerbread Bundt Cake found at the Plaza Inn at Disneyland. This delectable dessert offers a spin on the iconic Christmas cookie that will be sure to bring glad tidings to you and yours this time of year.
Course: Dessert, Snack
Cuisine: Disney Parks, Disney World, Disneyland
Servings: 10 mini bundt cakes
Author: Replicate the Magic

Equipment

  • 1 Hand mixer
  • 3 Mixing Bowls
  • 10 Mini Bundt Pans
  • 2 Pastry Bags (Use Ziploc bags if you don't have these)
  • 1 Toothpick (Or a chopstick if you're fancy)

Ingredients

Mini Bundt Cakes

  • 2-1/2 cups All-purpose Flour
  • 1 tbsp Ground Ginger
  • 1-1/2 tsp Ground Cinnamon
  • 1 tsp Ground Nutmeg
  • 1/2 tsp Ground Cloves
  • 1/4 tsp Ground Allspice
  • 3/4 tsp Salt
  • 1/4 tsp Baking Soda
  • 1 tsp Baking Powder
  • 3/4 cup Butter Unsalted & Softened
  • 1-1/2 cup Granulated Sugar
  • 2 large Eggs
  • 1/2 cup Molasses
  • 1 cup Water

Apple Filling (Not required to make a delicious cake)

  • 1 can Apple Pie Filling Homemade would be better, but this is an easy option.

Glaze/Frosting

  • 3/4 cup Butter Unsalted & Softened
  • 4-1/2 cups Powdered Sugar
  • 3/4 tsp Vanilla Extract
  • 3 tbsp Milk
  • Red Food Coloring
  • Red and Green Sprinkles

Gingerbread Man Decoration

  • 1 package Marzipan/Sweet Almond Paste Use Teddy Grahams as a quick alternative.

Instructions

The Cakes

  • Start by preheating your oven to 350°F. In a mixing bowl, combine the flour, spices, salt, baking soda, baking powder until they are evenly dispersed.
  • In a separate bowl, add the softened butter and granulated sugar. Using a hand mixer, beat the mixture (starting on low speed and working up to high) until the butter is creamy.
  • Add your eggs, one at a time, to the bowl and continue mixing with the hand mixer (this time at low speed…and don't forget the eggs, which we did and ended up with an oven full of mini volcanoes).
  • Once the eggs are mixed evenly, add the molasses. Mix until combined and then slowly add the water.
  • Now that the wet ingredients are combined, add half of the dry ingredients and mix. Finish by combining the rest of the dry ingredients.
  • Another very important step is to butter -and- flour each mini bundt cake. We tried this with just oil and had to start over. You'll definitely want a coating of flour in your pans to make sure all of the cake comes out of the pan in one piece.
  • Place the mini bundt pans on a larger baking sheet and bake for 22 to 26 minutes at 350°F. Test with a toothpick (or a chopstick) to make sure it's fully cooked before pulling it out. Ours took 26 minutes.
  • Allow to cool part way, then remove them from the pans. Continue to let them cool completely before filling and frosting the cakes.

The Filling & Glaze/Frosting

  • The filling is easy – it's just a prepared apple pie filling and ready to go. We had to break up some of the larger apple pieces in ours. Set this aside for a minute.
  • For the frosting, combine the softened butter, powdered sugar, vanilla extract, and milk. Using a hand mixer (you'll probably have to clean off the cake-battered beaters) start by mixing slowly, then increase speed. You'll want a fluffy buttercream.
  • Remove a portion of frosting (about 1/2 cup) and add 6 to 8 drops of red food coloring. This will be the pillow for the gingerbread man to sit on.
  • Place your white frosting and red frosting into separate pastry/piping bags (or use Ziploc bags with the corner cut off like we do).

The Mini Gingerbread Man

  • We used a sweetened almond paste to make mini gingerbread men…completely by eye without any templates. We suggest printing a photo of a small gingerbread man and placing it underneath a piece of parchment paper to serve as a guide. We didn't do this and ended up with a variety of shapes and sizes.
  • An optional step is to use a bit of the frosting prepared earlier to make a bit of black frosting to use for the eyes and buttons. Also, if you don't have time for this, use Teddy Graham bear cookies and use either black or white frosting to add buttons and a face.

The Assembly

  • Once the mini bundt cakes have cooled, use a spoon to scoop out a hole in the top. Load this with some of the apple filling.
  • Top each bundt cake with white frosting, add some green and red sprinkles, then add a small pillow of red on each.
  • Place the gingerbread men into each red pillow and serve.

Video

YouTube Video Transcript

Happy holidays, everyone! Today we’re going to be replicating the Gingerbread Bundt Cake found at the Plaza Inn at Disneyland in California. It’s got an apple-cinnamon filling with vanilla glaze, holiday sprinkles, and a little gingerbread man sitting on top of some red frosting. It looks delicious and we can’t wait to try it out. Let’s get started!

In today’s video, we will be baking. And rather than doing one large bundt cake, we’re going to be doing individual mini size. We ordered some new pans just for this video, so we will be trying those out. That’ll give us something a little bit more like the Plaza Inn. 

Bundt cakes are inspired by a European cake called a ‘Gugelhupf’ and they’re not associated with one particular recipe. To bore you with even more facts, the Bundt was popularized in the 50s and 60s when manufacturer, Nordic Ware, got the trademark and started making cast-aluminum pans and making the cake popular to serve at parties. 

All we have to do is go gather ingredients and come right back. Awesome!

We’ve tried a few different things and think that we’ve come up with the perfect recipe that, even if it’s not exactly the same, it’s still gonna taste good and look similar, but we’d like to think that we got it pretty close. Hopefully.So, we’re going to preheat the oven to 350° Fahrenheit. We’re going to mix all of our dry ingredients into one bowl, all of our wet ingredients in another bowl, and then we’re going to combine the two together. 

Yeah, so we’ve got all the equipment. We’ve actually measured out the ingredients already, so this should go together a lot faster than our past videos. Yep. A little “mise en place“…We have the pans right over here. Everything should be ready to go. Cool. Let’s do it.

All right, so we’ve got two bowls. Let’s start off with the dry ingredients in this one. Okay. White sugar, or granulated sugar, is technically considered a wet ingredient. Even though it’s dry? Yeah. Weird. Yeah – I think it’s because when it gets, when it starts to get wet it is… Oh it kind of caramelizes a little bit. Yeah, if you add a little bit of water to sugar, you know how it is like. It kind of dissolves in it…yeah. 

Another thing that you’re missing on here that you don’t see is brown sugar. That’s a typical thing in a gingerbread recipe, but something I found out is brown sugar is actually just white sugar with molasses in it. Ohh… 

So since we’re already adding molasses separately, why go through the effort of getting brown sugar. Just a little side note…to make one cup of light brown sugar it’s one cup of granulated sugar with one tablespoon of molasses. Okay.  And to get a dark brown sugar – you know how there’s the two different kinds at the store…that’s two roughly two tablespoons of molasses. Okay.

So we’ve we’ve simplified a little bit. We’ve got white sugar and just added a little extra to our regular measurement of molasses that you normally see. Cool. That’s awesome.  Cool. And also, look at the cool spices. I have to show that off. How pretty. 

It does look pretty when they’re all in there together.  Stop and smell it, too. Oh it smells so good. All right, so what spices are we dumping in there? So we’re gonna do the dry ingredients – so that’s… Pretty much everything on this side.  Yeah, let’s start with the flour, do you mind doing that?  Two and a half cups of all-purpose flour and dump that in there.  Let’s move that up here just a bit so that we can see what we’re putting in.  Okay.

So in this spice blend, if you look at how pretty that mix, it’s a tablespoon of ground ginger, one and a half teaspoons of cinnamon, one teaspoon of nutmeg, half a teaspoon of ground cloves – I actually don’t know what I’m what I’m pointing to…but quarter teaspoon of allspice. Anyway, tried to be a pretty, so.  So we’ll put all that in there. So now we’ve got one teaspoon of baking powder, so we’re gonna dump that in there. And then in addition to that, we’ve got baking soda right here – which is a quarter teaspoon of baking soda. 

And the last dry ingredient is 3/4 teaspoon of salt. Let’s mix it with a spoon. Okay.  This one…is kind of like a spatula spoon. You want me to mix that up while you’re putting in the wet ingredients. That would be awesome. Okay, cool.

Alright, so here are my wet ingredients. I’m gonna start with the butter first. A lot of times in recipes where you have a butter and sugar, you want to put the butter in and you cream it with the sugar. So, here you go. So there’s the white sugar and that butter. Ooh, that looks nice.I’m making a mess already. [Laughter] But it’s mixing together well.

I’m gonna make a lot of noise so I’ll wait just a sec. Your apron!!! What’s baking if you don’t get your apron dirty? You’re totally right! Here’s our mixer. I should have put the sugar in the little by little… just to cream. I’ll just start a little bit slower and then I’ll speed it up.

All right, now I think I can start to speed it up a little bit. Oh that’s off – oh it has it up and down So are we kind of going for like a smooth consistency here with the mix between the butter and the sugar? Yeah, you want it to be really fluffy and airy. Okay.

The rising and stuff will come from the baking powder, baking soda in here. And from the eggs as well that we’ll add in just a second. Okay, let’s go up a little bit more. So next up, we’re going to add two eggs, but we’re going to do one at a time. Just to make sure the egg is good and if for some reason you add a lot of extra shell it’s easier just to grab another egg out of the fridge. Much easier to grab it out of there than out of all of your ingredients mixed together. So. Yeah, so I’m gonna do one egg now and then I’m gonna mix it up a little bit more. We’ll do that until the egg looks like it’s pretty combined in there. And now final egg.

Can you crack that egg for us? I can try. I’m not a pro by any means, but that wasn’t too bad. That was a pretty pro move. Thank you! All right, so we’re mixing in that second egg. It’s looking good. Okay, ready for the Molasses?

Molasses.

K, I have one more trick on this one. Sweet molasses.

Something I read online – you have me talking in a drawl – k. Um, whenever you’re using molasses and there is like a liquid oil like a canola oil or avocado oil or something the recipe before, you measure the oil first and then you put the molasses in the cup. And that oil coating helps it from sticking. You know how when you like go to try to clean out something that’s really sticky like honey out of something? It’s really hard to get off the dish. Starting with the oil is awesome. So we pre-measured half a cup of molasses in this ramekin here. And I did lightly coat it with oil which is why you see those little dots on top. Just in hopes…it made it come out of the measuring cup really fast. Yeah.

But I was hoping too, it would just pour out a lot easier here. Looks like maybe that’s not so much the case. But at least we tried. Yeah it made it come out of the cup that I used to measure, you know, using measuring cups to put them into things that look like measuring cups. Yes. Just for video. And who knows, maybe it’ll wash out easier, too so.

I can’t remember 100% how we did the water last time when we were trying this. Let’s give this a try – start low…mix in that molasses. How do you say it again? Molasses.

Molasses? Molasses. But we gotta talk like the molasses just dripping out of your mouth. Molasses. Such a cool accent.

It looks like pumpkin pie filling, kinda. And smells like it, too. It doesn’t look like gingerbread? I guess you could say it smells like gingerbread.

So now we’re gonna need to combine the two of these: the dry ingredients and the wet. We’re gonna get a big cloud of dust if we pour this whole thing in, so let’s do. A little bit of… Do a little bit of that, maybe add some of the water, put the rest of that, and then the rest of the water. Okay. Sound good? Sounds good.

Are you good if I’m still mixing. Yeah, do you want me to pour some of this in? Yeah, go ahead and just lift it up over the top of that and do like half of it. And just slowly pour in a little bit for me. All right, here we go. All right, that’s good.

All right I think we’re ready for the rest of the dry ingredients and we don’t want to over mix this. I think that does make the cake really dense if you over mix, so… it feels good and let’s go ahead and put the rest of the water. All of it? I’ll just be careful. Yeah. Okay. And you can kind of mix with the hand mixer before you turn it on.

Let’s take a second and ask if they’ve subscribed yet. Oh yes, please subscribe to our channel. You might have already. If you’re watching a lot of our videos, we hope that you’ve already subscribed.

Yes, we love to see that we get new subscribers. If you enjoyed this video, please like it. Please subscribe to the channel. Please hit that bell because then you’ll be notified when we post new videos. And that way you can keep watching us make fools of ourselves and make new things and enjoy all the things we do. So… We’ve got a little display where we watch the amount of subscribers we get and the number of view counts. Anyway, we’re still new. We’re not expecting any big success overnight. We would LOVE to have your support and have you help us reach more people. Another way you can help us to reach out to more people is ask questions and comment to us. Having a conversation in like below our video actually does help us. We’re very grateful for any any of you that subscribe so… And please share this channel with anyone you think might enjoy it.

Okay, I think we got all the clumps out. Whoops. Okay, rather than doing a spatula I’m just gonna go around the edge with the edge of the beater. Look how pretty. It’s like… Really good.

It smells like gingerbread, like fresh gingerbread, what do you smell? You can’t say it smells amazing. I smell hints of nutmeg and cinnamon and gingerbread. I don’t know. It smells like Christmas. Uh, yeah?

Those those spices that are synonymous with Christmas are definitely coming out of this mix. All right, so we’ve got our mix ready to go in these pans. We do need to butter the… butter or oil the pans before we start to fill those. You may be wondering, “Why do you have this can of apple pie filling?” Well, the Gingerbread Bundt Cakes, the mini Bundt Cakes at the Plaza Inn (this year’s version) has an apple cinnamon filling and rather than going and making that whole thing, we picked up a can of this.

On a traditional bundt cake, there’s usually a pretty significant hole in the center. These do not have a big hole so we’re going to bake them and then we’ll just scoop out some cake and then we can put the filling in what would normally be a big void. Yep. In the cakes. This oven preheats in 90 seconds. So we gotta hurry. I know, well– you know how we told you up at the beginning to preheat your oven way far ago? We didn’t do that because we knew this would be beeping at us. Next up is greasing these bundt cake… bundt pans.

What’s the least messy way to do this? Um…good question.

“Teamwork.” “Teamwork makes the dream work.”

I’ll pre-spray those. There you go. Okay, with a bundt pan you definitely don’t want to overfill them. I’m going to fill up one of the pans and then I’ll let you fill up the rest of them. Is that okay? No, I’ll just let you do it.

You don’t want to fill them up all the way. Ooh, already got some on the side there. As you can see, we put them on a baking pan. A smaller baking pan. That makes it easier to load them and unload them from the oven. Let me just even them out. Probably move this to the center so you can see a little better. Like that. Oh great. Okay. Oh and I traveled all that.

My bad. That sounded like Mickey! Or Winnie the Pooh? That was more Winnie… “Minnie the Pooh”. “Minnie the Pooh?”

“Minnie the Pooh!?!” No! What is going on? I’m a little sleep deprived, I think.

“Oh bother”

That was good! Oh, thank you.

“Hoo hoo!” (in the style of Mickey Mouse)

Okay. Wait, do that again!

“Hoo hoo!” That’s hard.

“Hoo hoo!” “Hoo hoo!” Just wait till we do an episode with a Star Wars thing. Sean’s Chewbacca is pretty good.

It is really good. Can we hear it? No, not till we do a Star Wars episode. No? So follow us. Follow us. A reason to subscribe. If you follow us, then you’ll see a Star Wars Episode and you’ll get to hear my Chewbacca noise, but if you don’t follow us you won’t get to hear it. Obviously the choice is clear. Okay let’s load these in here.

In they go. We’re putting this on rack number three in this one, so here they go. All right, we’re gonna go ahead and mix together the frosting while we’re waiting for those cakes to cook. Actually, it’s a glaze not a frosting. Frosting, glaze… very similar. Frosting, glaze. Tomato, potato.

It’ll be a glaze if we pull it out put it on right when it’s hot. You’re gonna want to cool it down a little bit before. For today’s frosting, or glaze, as Sean corrected me… we’re going to be making one with powdered sugar so we’ve got one and a half cups of powdered sugar with a quarter cup of unsalted butter, which this is room temperature.

Then we’ve got some vanilla extract here, half a teaspoon – then a tablespoon of milk. And then a fresh bowl and clean beaters to use for that. You know how the topping of that had a little bit of red frosting that the gingerbread man was sitting on? Yep. So we’re gonna add some red food coloring to a little portion of that. Okay. Put on very last. Cool.

That leads me to another fun project that I can would love you. The little gingerbread man on top. I can definitely try. It looked like he was made out of marzipan. We did get some almond paste, which we will use to make a little gingerbread man to sit on the top of our Bundt Cakes.

Awesome getting the butter put into the Bowl here.  See! I grabbed the butter right out of there. Grabbed it with the mixer and there you go.

Let’s just mix it all. There’s the milk. So again, one tablespoon of milk. And then half a teaspoon of vanilla extract. Ours has the little vanilla bean specks in there. Don’t worry, those are not bugs. Okay I think we’re to a safe point where it’s not gonna spray powder everywhere, but let me start to up the speed. Ooh uhhh. [Mixer creating vibration sounds in Beau’s voice] Just kidding. Is there going to be enough for all of our cakes?

Okay, let me turn that off. Umm, they are pretty full. They might overflow. The frosting, it’s looking pretty good. We had that red frosting plan… uh we don’t need very much, we just need a little bit for a little gingerbread man. Just for like a little pillow to for the gingerbread man to lay on. So we’ve got two Ziploc bags right now – we’ll put all this white frosting in one bag… and then the red frosting once we mix it into this bag. Yep.

So we don’t want pink, we want red. So it’s going to use quite a bit of this food dye. Once it goes, one, two, three, four. Four drops might be enough. Ooh, that might be enough. It’s almost a pink though.

Yeah, I would almost say maybe a little bit more red. Two more drops? Yeah.

You don’t want so much food coloring that you taste the food coloring. Does food coloring even have a taste? I don’t know. Okay, open up your mouth… really? No! I don’t want to try it! Okay. I also don’t want my mouth to look like it’s bleeding.

Do you want blue? Try some blue food coloring? Okay, I’ll try the blue. It’s probably… Really?

Probably better. okay. I wonder if we’re not gonna be able to get it much darker… with it coming from white frosting.

Do we need some blue? Just like one drop of blue? It might make it purple, but we could try it. This is my my intuition. Like one drop. One drop of the… Because otherwise we’re gonna have purple pillows. And nobody wants that. What was that? Six drops of red and now let’s see one drop of blue. Ooh. Oooh.

Ummm… That doesn’t look… Oh no, oh no, ohhh nooo! Oh no.

Oh, that’s terrible… No! Oh, we’re not gonna have purple pillows, we’re gonna have black pillows, actually. That looks really bad.

No!

Do we have enough frosting that we can repeat that?

Of course.

Okay.

Okay, maybe we’ll have to steal some frosting from one of the other cakes.

If you’re ever trying to make like a purple color, like the color of a gravestone, for Halloween? A bunch of red with one drop of blue and you’re good to go. All right we’re gonna try and create red frosting again. That was my bad. Okay.

I didn’t realize how powerful blue food coloring was. I did five drops of red. Um, this is a little bit less of a portion of white frosting this time than we did on the last one. We’re not gonna want to frost them right away. either right? But we probably want to put the apple filling in pretty quickly. You’re going to want to do double that amount of frosting than we did, so that’s that’s it That’s what we’ve learned so far. Okay.

Now, I noticed that it said it’s a cinnamon apple filling. Do we need to add any cinnamon to this, or does this already have cinnamon in it? I assumed there is already cinnamon in this… um. There is cinnamon in there. Okay, cool! These apples are pretty big. They are pretty good slices if you can see from this. Yes.

So let’s. Let’s put that… and then we’ll transfer the rest to a storage container in a little bit. Okay, so these are pretty big pieces. Can you break up those those apple pieces a little bit more?

We put a little too much in there. We need to check it real quick… I don’t have a toothpick, but we do have a chopstick. You do that until it comes out clean. That did not come out clean, so go ahead and put ‘em back in for…

I feel like Beyonce. Diamonds. It looks like it, right? Got the glove… the one glove on. Obviously, you can make a little mini gingerbread man with gingerbread, too. But we’re just gonna go this way and try and sculpt out some gingerbread men with the almond paste. It’s kind of like clay almost. Yeah, edible clay. Work quickly because it will it will dry out. Look at that! Perfect! Oh yours looks way better than mine, I was making it way big… okay I gotta start over.

Okay, I’m making that one a little smaller. I think I went a little… I was a little too ambitious. There’s the head, here’s the body. Okay, that actually, that came out clean. Oh sweet! That one. That one.

It like… Some of it volcano-ed out. Yeah, some of it spilled out. Let’s let this cool for a few minutes and then we’ll transfer those over to a cooling rack.

Hey, if you turn it on its side it looks kind of like a shark. Okay. See, look… if you made its head a little longer. All right, let’s move these gingerbread people off to the side. And there’s our cooling rack. These should be cool enough to flip over and hopefully remove out of the pan. We’ll see if we got enough oil in there.Oh no.

It’s sticking? Oh no. We might need to let it sit for a minute. We forgot to flour the pans. We oiled them, but didn’t flour them. I forgot. I forgot that step. I even had some flour off to the side for this. We can let them cool a little longer, right? Cooling I don’t think is gonna help. It doesn’t help?No.

No, no. Here, oh no. Oh no. [Laughter] Oh no. Don’t look, don’t look! Oh no! Um… okay…. oh

Oh no. Ooh. [Laughter] We’re going to cook them another five minutes.

I will say, the taste is there.

Okay, there we go. Oh.

Hey, we can make cake pops. We could make cake pops. Gingerbread, um… bundt… I guess not bundt. Bundt is the shape. Bundt is the shape, not the flavor. Gingerbread apple-filled. Probably not apple-filled. Remove it from my presence immediately!

Back to the gingerbread people, we could add the little eyes and buttons to it while we wait. Yeah. It’s so tiny. Like that? Yeah, that looks good. And then some buttons. One, two, three. That’s a button… okay.

Do we do a smiley face? You could try one and see how it looks. That’s cute, I like it! Okay.

They look like commas from a word board. Damage control. Oh no! Well, he’s just a little… Do like a big ghost face. [Makes ghost sounds]

Oh, it’s a shark. I meant to do a shark the whole time. Okay, those look a little bit different. They look a little more done. At least the centers do. Okay.

All right, we’re down to four. “And then there were four.”

“There were six”, and “then there were four.” Grasp it but with the gloves. Are you okay if I mix up a new batch really quick?

[A few moments later]

So… we had to completely remake everything because we had a meltdown and it did not go over well. Well it started off simple… uh you saw us grease the mini bundt pans but key thing that we forgot to do was flour them. And also sometimes just oiling them like we did isn’t enough even if you do flour them. But you want to get in there and butter the… rub butter in and then coat them with flour and tap out the flour before you use it.

We couldn’t get them demolded, so we’re like, “we’re not going to make you all sit through us remaking the recipe on camera.”  So we redid it and I forgot to put the eggs in. And we messed up batch number two as well.

Yes, so batch number three is now a success and we’ve been able to take those out and let them cool. Yes. So speed track, here we are. Third time’s the charm.

The eggless batch, just… it was like a volcano. It just… I’m like, “it’s gotta stop dripping!” It was all over! And then it just kept going and going until like the pans were empty by the time. Yeah. Yeah. Big mess. Don’t forget your eggs.

Don’t forget your eggs. Don’t forget to grease and flour your pans. That’s what we’ve learned. Butter and flour. …and butter… yeah. No grease. Use butter. Go straight to the butter because you need it for these.

Okay, here is the big reveal. So when you make the bundt cakes correctly, this is what they’ll look like. With the amount of leavening (like the the baking soda, baking powder, and your eggs), this recipe rises quite a bit. Which will lead to more of a fluffy bundt cake… Yes. But just key… like you just want barely over half way. It makes about 10 cakes total. Yep, 10 cakes. These are the best six out of the cakes. Here is that apple filling.

You’re gonna just kind of push in and we’re gonna cut out a center. And don’t go all the way to the bottom like I do did on that one. Did I get enough out of there? Yeah, that’s actually – that looks better. Oh thank you!

You actually don’t have to press down too far because when you pull it out with the spoon it will yank some out from underneath. And so it’s still going to get quite a good amount of cake out of there even if you only press down just like a centimeter. Okay. We’re gonna go ahead and scoop the apple filling in this. It’s easier to add more than to take out. Yes, I agree. Fill them even more so they’re kind of to the top.

Also, the frosting. We realized the batch we did with the quarter cup of butter wasn’t enough frosting. Yes, so I tripled the recipe and it ended up being maybe a little too much. So maybe double the recipe. The one that we put on our website, on replicatethemagic.com, will have the correct amounts for you to make 10 mini bundts. I remade the red as well. There wasn’t quite enough red frosting to do all the cakes. Yep. So another thing too is I stole a tip from one of the pastry bags that we have. Ooh. And I cut a corner off the Ziploc. I made my own pastry bag. Nice!

And we’ll start in the center and work my way out. And then go in and it was like a ripple – kind of like this, right? Yep. Ooh. [Laughter as the bag makes a fart noise] Excuse you. [Laughter]

Okay, my curves got a little strange right there. And then the center, we’re gonna top with that red and then we’ll put our gingerbread man on top. Hey, from up above that actually looks really nice. From the side…

From the side… It looks good from far. And that’s all we care about. Maybe one more…and then we’re going to have you try.

Okay. Wait, but this is my this is my test… my first one. You got two. Yeah, both of mine look the same. They’re both ugly. I see, you’re going for like a star. I was going for the… Yeah!  [Laughter]

Yeah, I thought I was redeeming myself but I think I made it worse. Like an asterisk. “Asterisk”

It looks like a bunch of people. That looks very tall. [Laughter] Like a Christmas tree.

If you know how to pipe frosting the correct way, feel free to let us know in the comments. I’m sure you’re using a pastry bag is number one…not using a Ziplock. Using a pastry bag and one of the “spouts.”

So our next step is to put the red frosting on and also the sprinkles. Yep. I think we do the sprinkles first and then the red frosting. Yep, I think so, too. Okay and at the Plaza Inn they use green sprinkles that are more of the lines and then the the red parts are like dots. This is a mix, they’re all like all dots. Okay. Um.

They call them sprinkles because you’re supposed to sprinkle them.

They’re not sticking. They’re not really sticking… but… You just have to kind of aim.

Should we do the red pillow? See how this goes. Oh no, It’s kind of like… That is really small. Oh that looks like uh… Oh that’s a… Oh no!!! [Laughter after frosting springs out of an unplanned, newly-created hole] Oh no! [Slow motion laughter]

I exploded out of the bag! [Laughter] That looks cool Yeah! It’s not really what we’re going for, but it does look cool!

All right, I got a bigger gallon size Ziploc. Yeah. Yeah. This is really just to protect us from that side. Yeah… that was created. Not so much a… oh that looks a lot better. That looks that looks a lot more like what we’re going for here.

Oh, are you okay if I finish this up? Yeah go for it. You’re doing a good job. All that’s missing are our little gingerbread men. They turned out so cute. Those are gingerbread men. There’s one in a dress.

This is my Shark. I would say maybe if you have like a chocolate mold or like…uh or can buy some sort of mini gingerbread men, it might work a little better. You could even use Teddy Grahams. Oh yeah. Do some, like, white dots or buttons. That’s true.

Yeah a maybe a little smiley face. So that that’s probably the easiest way to do this. It didn’t look quite like a gingerbread man at the Plaza Inn. It actually… the the one they did at the Plaza Inn looked like it was made with something similar. Theirs just looked a whole lot better than ours. Put it on its little pillow. Oh, oh it was more…it was this way. Oh yours is like laying down on the pillow. Yeah, he’s relaxing. It’s like this… it like, is kind of like sitting in there. Oh, okay. I think. That looks good, though!

I’ll do that with the next one. Um, let’s put this guy onto this one because… Oh yeah. He’s perfect. They’re perfect. They’re a perfect fit for each other. Oh no. Oh no! I think I pushed his face off a little more. Okay.

The best part – let’s try them. Nervous. So, there’s some of the gingerbread cake, the apple filling, and then the frosting on top. All right, cheers. You ready? Cheers! Oh… Oh, kay… ready… go!

It’s not a dense cake… it’s like fluffy… it’s not really fluffy, it’s got kind of a… Got a great flavor! That almond paste is actually really good with this whole mix.

I have to say, I take it back, too. With the completed cake, when you do it the right way, it doesn’t taste just like pumpkin pie. You can tell there’s some ginger in there and it is really good! We’ve really upped the ginger in our recipe, too. Doing a full tablespoon seems quite like a lot. But it’s it’s a good amount, because it’s… it helps balance out the sugar from the frosting and the cake. This is awesome! Cool! Yeah!

I’m excited to eat more of these. I’m sure with practice, these would get even prettier. This is fun. It shouldn’t have been too complicated. We over complicated it. Make sure you have all your ingredients. Butter and flour! Butter and flour your pan so that it will just come right out when it’s done cooking. And it will taste amazing.

For the cake, it’s not like a lot of cakes that I’ve had before. It’s almost like a really soft cookie. Like a half way between a soft oatmeal cookie and a slice of cake. Yeah.

Go visit our website if you want to grab the recipe.  Again, it’s replicatethemagic.com.

Do we want to give it a score? oh… yeah this is a five out of five. Yeah, it’s a five out of five for me, too! I would definitely eat this again. It’s amazing! It tastes so good! I know I say amazing a lot, but it really is. If you have recipes that you want us to try making or different things you want us to try out, let us know in the comments.

Please subscribe to our channel if you enjoyed this video so you can watch more and please ring the bell so that you can be notified when we post new videos. And also like the video. Anything helps. And share it with your friends.

Thanks again for watching! Thanks so much!

Food

Bruce Bogtrotter’s Cake from Matilda the Musical

Recreate the iconic chocolate cake from Matilda with our step-by-step recipe and decorating tutorial. Must-try for any Matilda fan or chocolate cake lover. Delight in the magic of Matilda with this classic chocolate cake recipe at home.

Published

on

By

This is a DIY version of the iconic dessert from the musical adaptation of Roald Dahl's Matilda, which can be watched on Netflix.

Get ready to satisfy your sweet tooth and relive a classic childhood moment with us as we recreate the iconic chocolate cake from Roald Dahl’s Matilda. This massive dessert, served to Bruce Bogtrotter in the beloved children’s book and film, is a must-try for any Matilda fan. Follow along with our step-by-step recipe and decorating tutorial as we show you how to make this delicious chocolate cake at home.

Please don’t forget to like the video and subscribe to our channel for more videos like this one.

From Punishment to Treat: Recreate Bruce Bogtrotter’s Chocolate Cake from Matilda

Welcome to our newest Replicate the Magic challenge! Today, we’re going back in time to recreate the iconic chocolate cake from Matilda, which Bruce Bogtrotter famously eats in the classic story.

If you haven’t seen the new Matilda movie musical on Netflix yet, here’s a quick synopsis: As punishment for the cruel headmistress Miss Trunchbull, Bruce is forced to eat the entire chocolate cake in front of the entire school. Despite the challenge, Bruce finishes the entire cake.

The cake is described in the book as having chocolate frosting with a dark, seductive gleam. It’s a three-layered chocolate cake with chocolate frosting in the 1996 film version. It’s a four-tiered chocolate cake with chocolate frosting and maraschino cherries on top in the new film.

We’ll be recreating the Netflix version of the cake today, but on a smaller scale. We’ll make about a quarter of the cake with three cake mixes and lots of frosting.

To begin, we cut some cardboard and lined it with aluminum foil to make a base for our cake. We’ve also created templates for the four cake tier sizes, taking into account the size of our springform pans and the fact that we don’t want the cake to extend all the way to the pan’s edge.

We’ll use our springform pans for the top two layers. Because the other two layers will be much larger, we’ll use cookie sheets or “half sheets” and cut them to size.

To make the layers within each tier, we’ll bake one cake mix per cookie sheet and then cut each sheet into fourths to make multiple layers. The layers will then be stacked, with chocolate frosting between each one.

It’s time to start baking now that we have all of our ingredients and equipment ready! Follow along as we make Miss Trunchbull’s delectable chocolate cake from Matilda. Just make sure you’re wearing an apron and are prepared to get your hands dirty.

Bake the cakes for the time specified, or until a toothpick inserted into the center comes out clean. Allow the cakes to cool completely on a wire rack after they have finished baking.

While the cakes are cooling, prepare the frosting. In a large mixing bowl, cream the butter and cocoa powder together until smooth. Combine the powdered sugar, milk, and vanilla extract in a mixing bowl and beat until the frosting is light and fluffy.

When the cakes have cooled completely, it’s time to assemble the tiers. Spread a generous amount of frosting over the top of the largest layer on your foil-lined base. Repeat the process with the next largest layer on top of the frosted layer until all of the layers are stacked.

Cover the entire cake with the remaining frosting, smoothing it out evenly over the sides and top. To achieve a smooth finish, use a spatula or an offset spatula.

And there you have it: a delicious and iconic chocolate cake similar to the one Bruce Bogtrotter ate in Matilda! We hope you had fun baking with us and will return for more Replicate the Magic baking fun in the future.

Watch on YouTube: Homemade Bruce Bogtrotter Chocolate Cake from the Netflix Matilda the Musical – Delicious Dessert Recipe

Video Transcript

Today we’re going to recreate the iconic chocolate cake that Bruce Bogtrotter was forced to eat in the classic story of Matilda.

Have you seen the new Matilda movie Musical on Netflix? Do you ever think of Bruce’s heroic act against the cruel headmistress Miss Trunchbull? If yes, you’re in luck – we’re going to be recreating that famous chocolate cake.

Are you ready to bake along with us as we recreate Miss Trunchbull’s delicious chocolate cake? Grab your apron and let’s get started. We promise you won’t be disappointed.

[Introduction]

Let’s take a moment to talk about that famous scene where Bruce Bogtrotter is forced to eat the entire chocolate cake. Spoiler alert: He’s forced to eat the entire cake in front of the whole school. Despite the punishment, Bruce manages to finish the entire cake. In the book, the cake is described as one having chocolate frosting with a dark, seductive gleam. In the 1996 Matilda film, the cake is a three-layered chocolate cake with chocolate frosting. And in the new Matilda movie, it’s a four-tiered chocolate cake with chocolate frosting complete with the cherry on top, literally, because it has maraschino cherries on it. The cake that we’ll be making today will be patterned after this one… the Netflix version. It is such a large cake, so rather than making the entire thing we’re going to make it as if Bruce has enjoyed eating more than half of it. So we’ll be doing about a quarter of the cake… but don’t worry, there’s still going to be plenty of cake to share. I think we’re going to need at least three cake mixes and a lot of frosting. Wait right there. We’re going to gather ingredients and we’ll be right back.

We don’t have a platter the size of the one the cook used to bring the cake out on, so we’ve cut down some cardboard and lined it with aluminum foil. And that’s what gives us this right here. Pretty huge! So, we’re going to be creating about a quarter of the cake, filling up just about this much area. So we made this template of the full-size cake and the way we figured out the quarter size is we folded it into a quarter that’s about a quarter size of the cake and then what we did was from the shape we made templates for the four sizes of the tiers. We did take into account, because we don’t want the cake to go all the way to the edge of this… we took a little bit off of the edge here so that way the cake won’t be all the way to the edge of the pan. For the other tiers, we have this one here that gets a little bit smaller; this one here gets even smaller; and then this one here. The nice thing about these two, is these match up with some springform pans that we already have.

So these are our springform pans. So if you look, those fit perfectly in their quarter size of those pans, so that way we’ll be able to use those for the top two layers. These other two sizes are massive… you’re going to need a really huge pan, which we don’t have. So for these we’re thinking about using cookie sheets which is technically called a half sheet. And those are the ones that fill a big size (full-size) oven… home oven, not that huge bakery ovens. Yep. And we’ll make some of those and cut them down to size. We usually use this really small oven here. This is only going to work for these sizes. For the sheet pans, we’re going to be using the other oven.

Oh, one more question is… how do you get those layers within? Each tier of a cake usually has a few layers, so we’re going to cook one of this, one of this… Cut it into fourths and use three or four of the layers. Depending on the height, we’ll be able to stack those. Are we’re gonna put chocolate frosting in between each layer? Oh, we’ve got to. Oh man, this is going to be crazy! We have a lot of frosting. This is not sponsored by Pillsbury, even though we got a lot of it here. We’ve got four things of frosting.

One of these cake mixes will make a single cookie sheet (the half sheet) so we’ll make two of those. And then for the duo here, we’ll use one box. So three boxes in total of regular cake mix. Prepare it to the directions on the back of the box. On this one it’s water, oil, and eggs. If you’re wanting to make the full-size “Bruce Cake” you’ll want to quadruple all of what Beau just said. Yes. For the bigger layers, just make a few more sheet pans. Hopefully it doesn’t like to tip over. In theory, it will work so let’s clear this off and start mixing that cake.

All right, let’s go ahead and get started mixing these cake mixes. If I can open the box. All right, there we go. All right, should probably follow the directions, I guess.[Laughs]Okay, so first we need to mix in the cake mix. This is gonna go everywhere. Oh! there we go. We’re good. Do you need scissors? No, we’re good – I got it. Crisis averted. Okay, putting that in there. One cup of water… Let’s go ahead and put in the water. And then it calls for one half cup of oil. All right, here’s the oil. Okay. And here’s a [1/2] cup. Do you want me to hold it?Sure! that would be great. We’re using avocado oil. The cake mix calls for 3 eggs. Oh. Oooh. Oh! [Laughter] Oooh, that was lucky! Are you nervous? Yeah. How did you do that? Gotta just go for it. So we’ve got everything in there. Are we gonna go ahead and mix it up now?I can tell why Miss Trunchbull is mad that a piece of her cake got stolen… because it probably took a long time to make the cake. Especially if it’s not made from a box.

We were debating on whether or not to go from scratch this time, but we went for the simple route. Something we probably should have done before mixing the cake was getting the pans ready. And we’re gonna remember the flour this time because last time we made cakes we forgot it and it was a disaster. We got our parchment paper. The reason that springform pans are actually really nice for this type of thing is… the bottom of the pan detaches. We lined the bottoms of these with parchment paper. You’re going to cut these into a circle. Easiest way is to fold this a bunch of times. Kind of like creating a… Am I doing that with this one? Paper snowflake. Yeah, yeah. go for it. So, just fold it in… Fourths?

Fold it in half, yeah then fold it in fourths. And then you’re just going to keep folding on that center point. I’m missing a crucial step here. So what did you do after this part? K, so you folded it in fourths, right? Yes. K, grab that point, that center point. Okay? And you’re gonna fold it again. Like that? So you just hold that there and then you’re gonna want to cut here. Hold yours up to that center point. Make a line with your fingernail. I’m just gonna go for it. And you’re also left-handed. These are right-handed scissors. Okay so this takes care of the bottom. This is parchment paper That cake’s not gonna stick to it. It’ll pull right off. We’re going to use Crisco (or you can use butter) to line the edge of this and then we’ll dust it with a little bit of flour. This is some Crisco reserved for doing this to pans. Coat the inside. You don’t have to worry about doing it on the bottom because you have that parchment paper that’s going to keep it protected. So that’s what we’re looking for, just a really thin layer like that. Again, just a thin layer.

So that is perfect. It’s okay if the bottom gets some of the flour on it. And you’re going to just tap it and as you shift the pan like this you just want it to lightly coat that Crisco (or butter if you’re using butter) and then when you’re done, just tap the rest of it out. Let’s put the bigger one in this oven and then this might be able to fit with the sheet pans. Oh, okay. As far as the volume, we just want them to be about the same height. This is what Miss Trunchbull would like, I think, if she got to pick a cake mix. She probably made the kids grind the chocolate. Probably. Remember in the movie – the 1996 movie. Did they call her ‘cook’ or ‘cookie’? I don’t remember. She comes out and she’s like sweaty and she just like wipes her face. Oh yeah and she’s like “her blood, sweat, and tears went into this cake.” Oh yeah, and then she. Then she’s like… Yeah. So gross! Well, our “blood, sweat, and tears are going into this cake.” [sniffles as wipes face] [laughter]Okay, so there we go. We’ve got a good amount of cake. All right, so we’re gonna do this bigger one in the little oven. We’ll hurry and whip up the cake for those two sheet pans. Go ahead and just mix those other two boxes in one bowl. And then just distribute it between the two sheet pans equally. We’ll throw this in the oven and skip ahead to pulling those out of the oven and letting them cool.

Oh, we got chocolate cake. It’s sad that we’re only using a quarter of it. We are using the whole thing. Wait, how? We might only use three quarters of it. We cut this into fourths and we’re using this for multiple layers. Oh, okay. That makes sense. So don’t worry. We have plenty of cake to eat it. We need to let these cool. We have the sheet pans and things about to come out. We’ll be right back when these all cool down. And then we can start building.[music]All right, our cakes have cooled now. So now we are going to start assembling our ‘Miss Trunchbull’s cake’ that Bruce eats. So we’re going to use this stencil to kind of cut out the sheet cake. I think if we do that one there. Oh cool, so we’ll be able to get two from each sheet cake. We can get one of this size here and then… I’m gonna just… We’re just doing a rough [cutout]… It might be better to do the whole thing and then cut the edge so that it’s the same on all the edges. Okay, so we won’t worry about cutting off this.

Yeah, we’ll do that at the end because then all the tiers will look like they were cut at the same level. I like that idea. Yeah. Don’t cut your fingers. Yes, be very careful with knives [said in unison]. Okay, that one’s good. Perfect sizes. Yeah that’s awesome. Okay. So line this up. Do it just a little bigger like that. Yeah, perfect. And go straight up and down and just pull it. Don’t cut through the parchment paper below. Oh… Do you want to fix it? Yeah. Okay. I’m not catching your vision. This is the frosting we’re using: Pillsbury Chocolate Fudge. We don’t have piping bags, but we do have a spatula. We don’t want our cake sliding around, so we’re just going to put a little bit of frosting down first before we put our first layer. Just some spots. This is going to be a lot of chocolate. Definitely. Okay, now we need to carefully lift that out. I’m nervous. It looks good. Okay. Layer one of several.[music]Two is perfect for that. Whoa! That is a lot of frosting. Yeah, look at it from overhead. It looks so cool with the layers. I think we got it pretty good. Yeah. Maybe in a future video we’ll have to do this again and do the entire cake. Look at that! Okay.

That’s crazy! I don’t think I’ve ever made a cake with this many layers before. I’m glad we’re only doing a quarter of it. I know, it already looks like it’s gonna tip over. We’re gonna use this for the very top. Right there. I think we might want to put a skewer [in]. All right, we have two skewers. You might want to serve this as a birthday cake and if you do, we highly suggest that you anchor this in place so it doesn’t topple over before your guests arrive. Just make sure to take the skewers out before you eat those parts of the cake so you’re not chewing on splinters. Easy way to cut a skewer is use your knife and just kind of roll like that. And be careful. And that lets you do a clean break. And then just make sure all the splinters are pulled off before you put those in the cake. And stick them side by side in through this top piece. If you were doing the entire cake, it probably wouldn’t have a leaning issue… but since we’re trying to do a quarter gravity is working against us. Oh that was awesome! Okay, so we still have a little bit of frosting left here. Wipe the spatula off on your serving platter. All right, so I’ve wiped off the spatula.

That’ll help get kind of a nicer finish. We want to have these horizontal lines. So in the movie, the spatula lines are like this. Let’s work quickly. It does look like a Roald Dahl cake. Yes, it does. I have no doubt that you’ll be able to do better than this. Please hit that like button, please subscribe to our Channel, and please ring that Bell because then you’ll be notified every time we release a new video. Okay, last step is to cut that edge. Um, see how you still see those edges of that sheet pan? Yeah. So we’re just gonna take the knife and make it look like Bruce just cut into that little bit of layer there. That’s awesome! Wow! that is starting to fall. Okay, the last thing to top this off… the cherries. There were over a dozen cherries in the Netflix version. We got the ones with the stems. Ah, that’s a little easier. We like to make dirty dishes. Let’s see. So, we’re just about right there. Do you want to…? Just put them right above. Ooh, these smell really good, too. Put a cherry on top. Do you like cherries? No, I do not like cherries. I’ll eat the ones you don’t want. This turned out awesome! Let’s kind of do a slow spin. We can’t really put this on a turntable, but…

[music]

Do we eat it with forks and plates? Or do we eat it like Bruce did? Let’s eat it the way Bruce ate it in the movie. Okay… ready? Yeah! All right, let’s go for it. Oh. Oh, oh he went for the whole fistful of it… so it’s kind of a hybrid of the Netflix [version]. [nom nom sounds and laughter] I look like I have a chocolate goatee. I would recommend eating it with a fork instead of like Bruce, but we had to replicate it exactly like the movie so… Really fun way to do a cake. This would be so much fun at a kid’s birthday party. Yeah, just make this cake and let the kids dig into it. If it’s outside, let them dig into it. I think we’ll eat the rest of it with a fork. Look at my nose. [laughter]All right, so this would be a great snack for a Matilda watch party. It’s delicious and it’s hilarious. You might want to do it outside… Yeah, it’s a little messy.

I give it a 5 out of 5 stars. As far as taste goes, obviously it’s going to taste good. It’s a Pillsbury box cake with prepared frosting. But for the fun level of it, it definitely gets a five from me. I agree. So you’re five stars as well? Five stars, yep! Awesome. If we ever revisit this, we’ll have to do a ‘from scratch’ recipe. If you have a favorite cake recipe that works for you, please share it in the comments. We’d love to get your feedback. If you like this video, please like it and please subscribe to our Channel. Also, please ring that Bell because then you’ll be notified when we post new videos like this one. You can also check out other things that we’ve made on our website at replicatethemagic.com. We also make a new video every week here on YouTube. Thanks again for watching and we look forward to seeing you next time. Thanks.

Let’s go eat some cake. Goodbye.

Continue Reading

Food

Grinch Ice Cream Sandwich from Seuss Landing at Universal’s Islands of Adventure

In this episode we decided to take on the Grinch, the cookies inspired by him are a cinch. All the Who’s down in Whoville no doubt would agree, cookies can make a Grinch heart grow by three.

Published

on

By

In this episode we decided to take on the Grinch, the cookies inspired by him are a cinch.  They can be found in Orlando’s Seuss Landing, and just one green bite leaves your stomach expanding. All the Who’s down in Whoville no doubt would agree, cookies can make a Grinch heart grow by three.

Watch us make Grinch Ice Cream Sandwiches from Seuss Landing at Universal’s Islands of Adventure in Florida

Please don’t forget to like the video and subscribe to our channel for more videos like this one.

Grinch Sugar Cookie Ice Cream Sandwich from Seuss Landing

This is a copycat recipe for the Grinch Ice Cream Sandwiches from Seuss Landing at Universal's Islands of Adventure in Florida.
Course: Dessert
Cuisine: Universal Studios
Servings: 7 Ice Cream Sandwiches
Author: Replicate the Magic

Equipment

  • 1 Heart Pattern Printed at Full Scale from ReplicateTheMagic.com
  • 3 Mixing Bowls
  • 1 Electric Mixer
  • 1 Baking Sheet
  • 1 Parchment Paper
  • 1 Wire Cooling Rack
  • 1 Ice Cream Scoop

Ingredients

Cherry Heart Candies

  • 2 tbsp Unsalted Butter Softened
  • 3/4 cups Powdered Sugar
  • 1/4 tsp Vanilla Extract
  • 1 tsp Milk
  • 1/2 tsp Cherry Extract
  • 10 drops Red Food Coloring We used 8 in our video, but you should use at least 10.

Cookie Dough

  • 2-1/2 cups All-Purpose Flour
  • 2 cups Powdered Sugar
  • 1 tbsp Baking Powder
  • 1/2 tsp Salt
  • 1/2 cup Unsalted Butter Softened
  • 2 large Eggs
  • 1 tbsp Vanilla Extract
  • 12 drops Green Food Coloring We used 10 in our video, but you should use at least 12.

Cookie Sugar Coating

  • 1/2 cup Powdered Sugar
  • 1/2 cup Corn Starch

Vanilla Ice Cream (If Making Ice Cream Sandwiches)

  • 1 container Vanilla Ice Cream Not required if you're just making the cookies.

Instructions

Cherry Heart Candies

  • Ideally, make the candy hearts the day before so they can harden. You can always make them directly on the cookie if you need to. First, print our heart pattern template, which can be placed under parchment paper as a guide for creating consistent-sized hearts.
  • In a medium mixing bowl, mix all the Cherry Heart Candy ingredients together (you are making a frosting that will be used to pipe heart shaped candies).
  • Place the frosting into a sandwich-size Ziploc bag and cut a small corner off the end. Pipe each heart (or “R”) onto a piece of parchment paper and allow them to harden, preferably overnight. If you’re in a pinch, these should be able to be transferred carefully to your cookie once it’s ready

Grinch Cookies

  • Preheat the oven to 350°F.
  • In a large mixing bowl, mix the dry cookie dough ingredients together with a large spoon.
  • Add the butter to the bowl. Cut it into pieces as you as it is added.
  • Add the eggs, vanilla, and food coloring and mix with the hand mixer until combined. Be careful not to over mix.
  • Prepare the Cookie’s sugar coating by mixing powdered sugar and corn starch in a medium-sized bowl.
  • Form a ball of dough, about 1.5” in diameter. Roll each ball in the powder mixture and place them on a baking sheet lined with parchment paper. Slightly press down on each ball of dough.
  • Bake for 10-14 minutes until the cookies are showing a crackly texture on top and just as they start to brown.
  • Remove from the oven and place on a cooling rack.
  • Add a heart to each with a dab of frosting.

Grinch Ice Cream Sandwich Assembly

  • If making ice cream sandwiches, scoop soft vanilla ice cream into the center and serve to your lucky family, friends, and guests.

Video

Notes

Download the candy heart template at replicatethemagic.com
Continue Reading

Food

Holiday churros from Disney Parks

Today we are replicating the Yuletide yumminess that is the holiday churro.  Join us as we replicate some new and some familiar festive flavors that will make your jingle bells rock.

Published

on

By

Today we are replicating the Yuletide yumminess that is the holiday churro found at Disney theme parks. Join us as we attempt to make some of the classic renditions like red and green sugar churros, peppermint churros, as well as some awesome new festive flavors of our own design. These sweet seasonal snacks will make your jingle bells rock and will ensure that your holiday get-togethers may be merry and bright.

Watch the Holiday Churro episode on YouTube

Please don’t forget to like the video and subscribe to our channel for more videos like this one.

Continue Reading

Trending